The house came with approximately a bajillion (eight) expired smoke detectors installed in the three required locations. There were a couple of types: one set wired into a security/fire alert system, and then a mix of other bolt ons. They all had differently sized base plates with differently spaced screws in a mix of installed-with-drywall-anchors and just-kind-of-there holes.
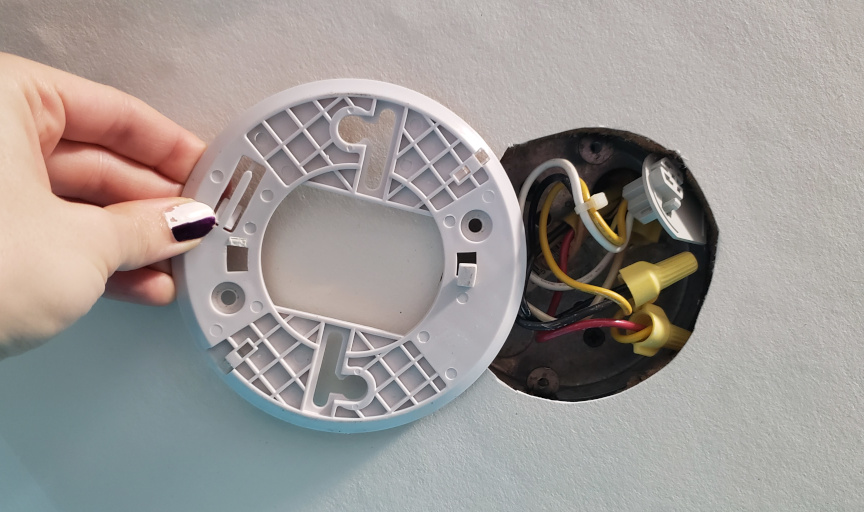
The new smoke alarms matched a few of the existing holes, so I installed those there. That left all of the security system base plates just kind of there. It’s not worth it to me to yoink the security system which means covering it with some sort of plate which will look janky no matter what I do–
baseplate and companion hole with just barely visible screw hole tabs
[due to events and situations, two years pass]
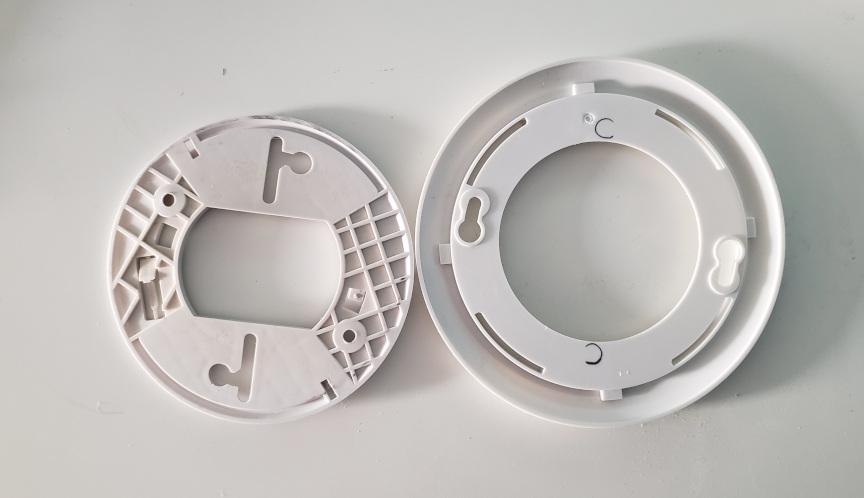
Okay, time to do something about this. The new base plates are larger than the existing ones, so the screw patterns don’t align. However! The holes for the smaller plate are just inside the plastic for the larger plates letting me drill some new holes without requiring me to fabricate anything.
Two differently sized base plates, both viewed from the back. Left: security system. Right: new smoke alarm baseplate with smaller screw hole pattern marked.
New holes drilled, I checked the clearance between the back of the smoke alarm and the screw head (acceptable), and installed them.
Looks right, which is good enough. Now to do this for all of the others!
Installed larger base plate with the same mismatched screws that the original baseplate used.
Due to some choices made by the previous owners, the (forced) air ducts to the attic spaces are at floor level, which means that no standard $5 at the store stamped register grate will fit in a normal way, or a way that looks good. They are also a nonstandard but modern size, which means that a replica gravity register won’t look right because the repros are way too big.
So the obvious choice is to custom make some mini gravity registers.
The design was based around a few minimum sizes:
be at least a little thicker at the top of the baseboard than the thickness of the baseboard itself
be bigger than the hole in the wall
and some maximum size constraints:
stick out as little as possible
not be more than an inch bigger than the hole in any direction so that the attachment screws will hit framing instead of being sunk into drywall
be entirely made out of salvaged wood
and the most important constraint:
must be cute
I spent a while thinking about how to implement louvers. Considered 3D printing something or perhaps salvaging a louver box from an old grate, but decided against adding complexity and went with a slide in panel. That does limit the air control to all or none but it can’t be beat in terms of reliability and ease.
Easy one first
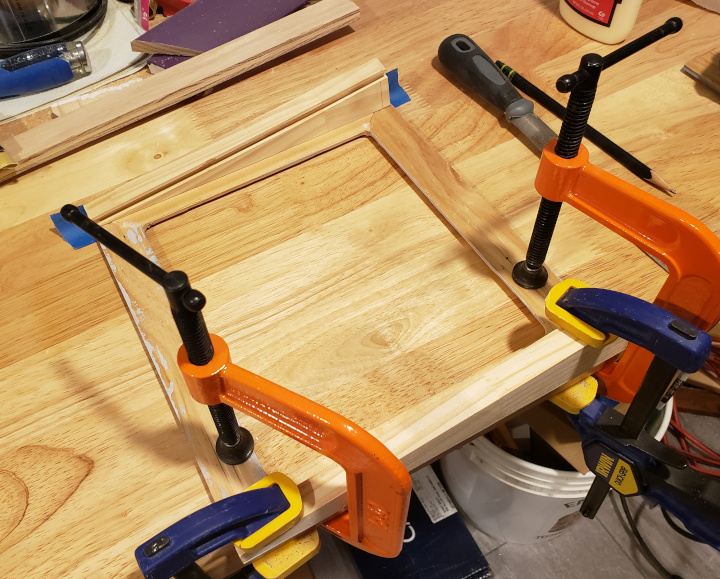
I cut two identical triangle pieces for the sides routed in a slot on the long vertical edges. I also made a pretty standard mitered frame with glued corners out of some salvaged edge trim. Once the frame was dry, I routed in some Decorative Edge into the inside edge and smoothed the interior corners. Then I glued the frame to the hypotenuses of the sides and clamped it to dry.
Frame and sidepieces in the glue-up
While that was curing, I cut a piece of panel to use as the air dam. I also prepared a piece of decorative expanded aluminum for spraypainting by lightly sanding it and scrubbing it off with alcohol before standing it up in the “spray booth” box.
While that was drying, I primed and painted the woodwork.
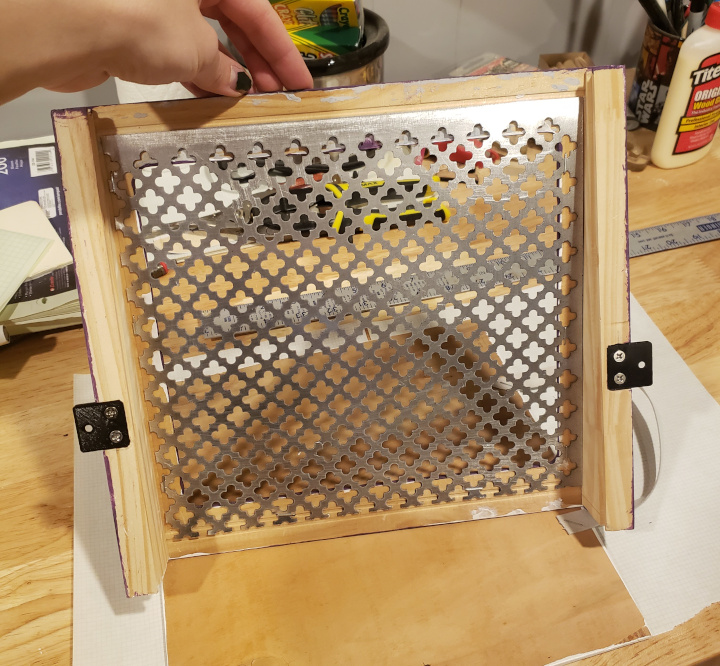
Then I decided that the best way to attach it to the wall was to give it little tabs. I made a simple nearly-solid model and printed it off. Then I cut notches into the sides, positioned so that the tabs would just stick out above the top edge of the baseboard once it was installed. I also installed the grate by stapling it in place from the back.
Back of the frame with grate and tabs installed.
The air dam got a leather handle, about 1/2″ by 5″, also stapled on from the back.
Altogether, it looks like this.
Register installed with air dam slightly lifted.
I have to make a second one that fits into a corner. Post about that one when the wall that it’s going on is completed.
I got here by finding The Problems when I went to replace a section of water damaged wooden wall paneling under the window in the attic. In my hubris, I removed the 1950s era mouse-turd-filled insulation to replace it with some modern recycled glass and put my hand through the windowsill…
Let’s go, this won’t take long!
First: grabbed image so that we have some vocabulary in common:
Vocabulary.
However, note that I’m dealing with a vinyl window here and that creates a sort of frame-within-a-frame situation.
Ultimately, there were several parts to this project:
Remove the various trim pieces (wood on the inside, aluminum on the outside) before removing the window in order to assess the damage and scope of repairs
Figure out how to replace the parts that needed replacing
make those parts and install them
Put the window back (including exterior trim) and caulk it
Assemble new interior trim
The interior trim came off relatively easily. It was nailed and caulked into place, both with a heavy hand and some help from rust, which is a pattern I’ve come to expect from this house. The aluminum trim on the outside was screwed and caulked into place and after cutting the caulk, came off easily. After removing the screws and sash clips(?) from the window, it also came out pretty easily.
At an earlier point, the upper sash in the window had started hanging crooked. With the window out and down where I could easily reach it, I determined how to fix this (re-set the spring) and the immediately broke the thing that holds the spring, thereby making my problem worse. Replacement parts not immediately available, I’ve put the problem off by cutting a dowel to a length that holds the sash in place.
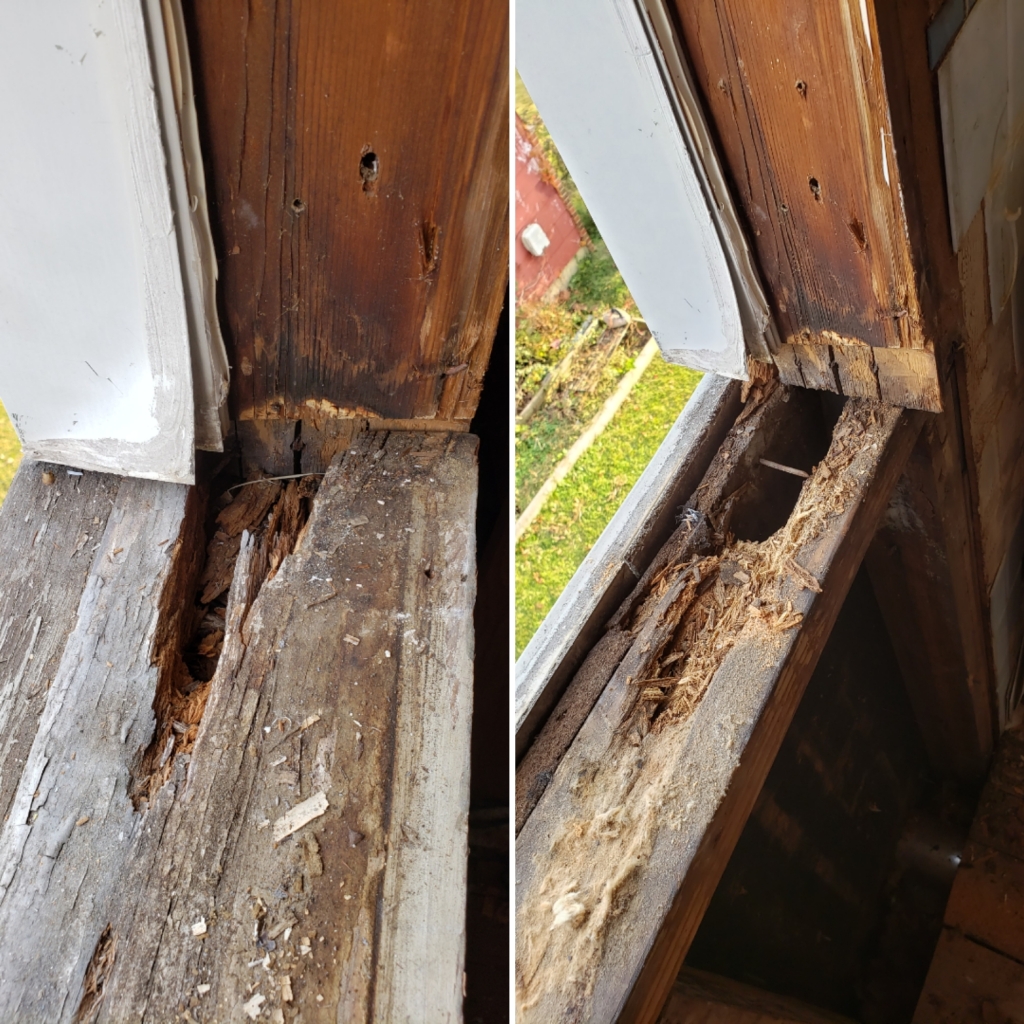
1. Assess the damage
It was pretty clear from the start that this was a water damage problem. When I bought the house there was an air conditioning unit wedged into the window that had as far as I could tell been there since around 2001 and had been allowing water inside the the whole time. It was also larger than the opening of the window and had forced the bottom part of the vinyl window frame away from the side parts-literally stretching it out of shape. I suspected that was the main source of the water, but there were also holes in the caulk between the bottom part of the vinyl window frame and the aluminum cladding that were situated directly above the worst of the damage. It’s unclear if the a/c unit contributed to that or if it was just 20 years of rainwater getting in. I did not find any other incursion points.
Left: rotten windowsill. Right: rotten framing.
The wood disintegrated when I touched it. In order to have any faith in the sturdiness of the framing, I decided that it would need to be replaced. This entailed removing the sill (cut it in half and it popped out, which it definitely should not have done because the nails at the ends had rusted to nothing), removing the worst sixteen inches of the horizontal frame, and about ten inches of the vertical frame.
At this point I had run out of daylight and called it a night.
2 Replace parts
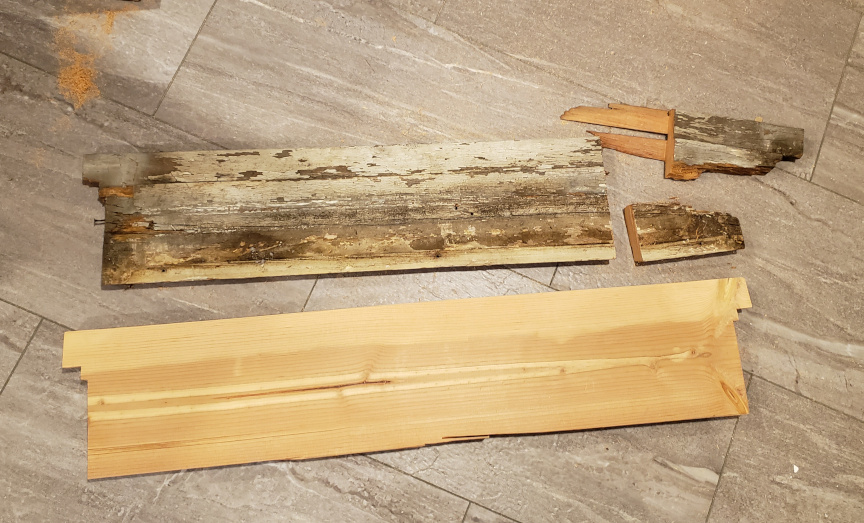
I was not going to be able to buy replacement windowsill at the local hardware store- but I did have some 2×10 laying about from a workbench project. That was a little bigger than the original sill piece, so I cut it down to size and shaped it using a router, miter saw, and belt sander. It’s not the neatest job, but it got the job done.
Top: removed windowsill. Bottom: hacked to size replacement.
The framing pieces were just straight sections of 2×4 cut from leftovers.
It seems like I didn’t take a picture before I put the new insulation in, so the following picture shows:
new sill, installed by cutting it in half and then gluing it back together in place. After the glue cured, it was shimmed to the correct angle, and then nailed through the shims to the framing. This definitely isn’t the right way to do it, but I didn’t want to take the entire frame out of the wall.
replaced horizontal framing visible in the right side. The right end of the old framing and the left end of the new framing share the end of the vertical 50/50 and are glued together. The right end of the new framing occupies the entire width of the vertical on that side in order to mimic the original construction.
Vertical piece not visible behind the insulation. It is glued to the original framing on both ends.
Every newly created joint was also given a triangular brace for additional strength and stability as represented by the green triangles.
It’s a vibes based glue-up, okay?
3 Put window and trim back in
The window and aluminum trim went back in as easily as they came out. The aluminum required some gentle persuasion with a hammer due to discrepancies between the old sill piece and the new sill piece but not any more persuasion than removing it required. I then caulked the daylight out of it, shut the window, and called it a day.
Window installed on top of new sill with wall panel installed underneath.
Doing this work also required removing the tiny wing wall that separated the bedroom area from the tiny bathroom area, so that’s why there’s a vanity just hanging out right there. You may find yourself asking, “where was there even room for a tiny wall there??”
4 create and install new interior trim
Well! There wasn’t room for a tiny wall there. There still isn’t. But because there is a bathroom there, there must be a wall there.
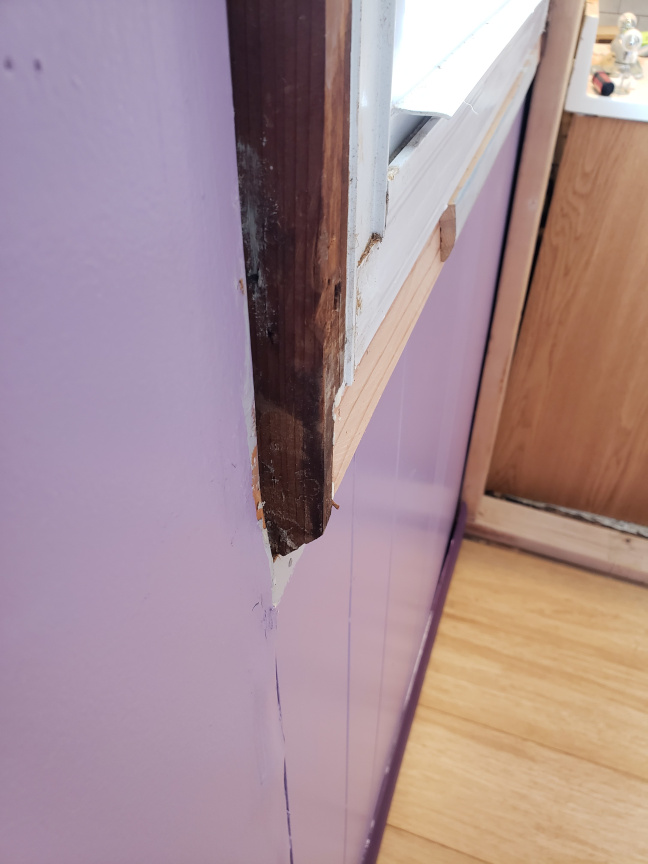
The window framing was also originally sized for the wall to be finished in drywall. The wall is instead finished in wooden paneling, so there’s about 3/8ths inch of framing sticking out beyond the surface of the wall. The previous owners solved this by just sort of gluing pieces of quarter round to the edge of the casing trim until the gap was closed.
window frame protrusion from finished wall
The window also extends above the level of the ceiling. The previous owners just sort of stuck a piece of wood up there.
I framed in the wall just enough to be able to proceed with the fiddly work of creating window trim. This has involved creating:
a lower stool
a marginally different upper stool
a lower apron
fitting vertical casing in an unusual manner
offset pieces to soak up that 3/8ths of an inch
Purchasing window stool at the hardware store was unreasonably expensive- and didn’t even meet the shape of this window. So I made the upper and lower stools out of 1×3 inch poplar by using a router to create the rounded edge and a combination of sawing and chiseling to create a profile that matched the window/wall.
The upper stool was designed to close the gap between the head of the window and ceiling as well as support the ceiling itself. The material that the ceiling is made out of is so soft that no fastener can be secured to it and in some other places is collapsing under its own weight, so I made sure to affix the stool to the lathe-like strips that the ceiling is attached to. This created a sort of ceiling sandwich, which will hopefully be stable.
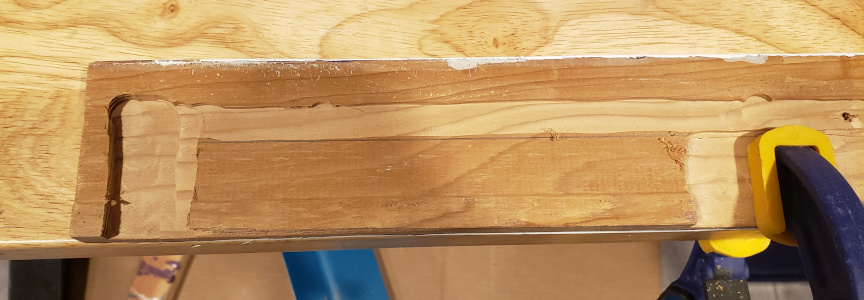
I created the apron (no piece even available to buy locally) out of salvaged baseboard. I routed some notches into the back of it so that it would clear the extended framing of the window.
routed out back of window apron
I then created the offset pieces out of door jamb. The pieces I bought had a rectangular profile about 3/8ths by 1″, real dimensions, and had one corner neatly rounded off. I cut these to length as needed.
I prepainted all of the pieces as I intended to do some fairly complicated paint work on this frame, and I’ve found that in general prepainting everything makes assembly much much faster by reducing final painting to just filling in the nail holes.
Window stool, apron, and offset pieces (purple) glued together
With the upper stool and lower stool and apron assembly installed, I then fit the vertical pieces (one offset piece and one casing piece). I did not make pieces for the right side because I have not yet completed the wall over there and thus I do not have the final dimensions of the casing on that side of the window. After that I used some more salvaged baseboard to create trim that fits the odd curve between the top ceiling and angled ceiling.
The completed corner and window look like this! I’m really pleased with how it’s turned out.
one whole completed corner
I am waiting to do the touch up paint on the nail holes until I’ve created every nail hole in those colors.